Halloween Hacks: 7 Brilliant Costumes Made from Household Objects

Going to the supermarket takes on a whole new meaning when the goal is to look for ingredients for costumes. Who knew you could use ordinary household supplies to create Halloween haute couture? Add some craft supplies, and construct the costumes in most cases with just staples, packing tape, and glue. They're easy to make, and you and your child can work on them together. But the first thing you'll need to do is go grocery shopping. Take your trick-or-treater on a trip down the aisles, and let your imaginations run free.
Cowboy Costume How-To
Howdy, pardner. To turn your kid into a charismatic cowboy, just rustle up some brown-paper grocery and trash-compactor bags. When you get home, snip and punch them into a fringed vest and chaps, then add paper-fastener studs and candy-cup conchos. A mop-maned horse is ready to accompany this rider on a hunt for candy.
Materials
1 pack trash-compactor bags
1 box brass paper fasteners
1 paper grocery bag
1 pack foil candy cups
1 aluminum loaf pan
1 rope-style mop head
1 pair shoelaces
Chaps template
1. Using our templates as a guide, draw chaps onto an upside-down trash-compactor bag. Fold up open end for cuffs. Cut out chaps.
2. Stud each leg along outer edge using a hole punch and brass paper fasteners; push fasteners through top fold of gusset only so bag will still expand.
3. Decorate some fasteners with flattened foil candy cups and thin strips of brown paper; fringe edge of each leg.
4. Punch holes through each leg at inside of knee, upper thigh, and waist; use shoelaces to tie chaps over jeans.
5. Cut away sides of a medium size paper grocery bag; think of bag's bottom as the shoulders. Draw bottom portion of the vest pattern onto front of bag, and the top portion onto bag's bottom.
6. Cut front and top of bag along tracing (back of bag remains intact). Fringe bottom edge.
7. Punch holes in front and back of vest, as indicated, and insert brass fasteners.
8. Loop rubber bands between fasteners at sides and at front to hold vest closed.
9. For crown of hat, punch hole in center of each long side of an aluminum loaf pan, and crease down the middle.
10. For brim, use our brim template to draw hat brim onto kraft paper. Cut out along outer edge, and cut out center.
11. Cut tabs along inside edge; tape to inside of pan. Thread shoelaces through holes in pan and knot on outside.
12. For the belt buckle: Draw an oval onto cardboard. Cut out.
13. Cover in foil, and stud with brass fasteners. Use duct tape to fasten buckle to a strip of corrugated cardboard cut across the grain, long enough to wrap around the waist.
Related: 15 Kitchen Shortcuts That Will Change the Way You Cook

Space Invader Costume How-To
This space invader is ready to explore galaxies, thanks to his high-tech night-vision goggles, egg-carton space suit, and foam-cup helmet. His weapon -- a cookie press with a plastic-cup-and- cone insert -- protects him from alien encounters.
Materials
55 Styrofoam cups
6 egg cartons
1 roll duct tape
1 cookie press
1 pack plastic cups
1. You'll need six bottom and two top halves of cardboard egg cartons (with "windows" on the top). With a utility knife, cut 5 diamond centers from each bottom piece, and reserve for buttons. Cut 1 bottom piece in half crosswise (for two 2-by-3-cup pieces); 3 others in half lengthwise (for six 6-by-1-cup pieces; discard one); and from another, cut 2 cups from one end and discard (for one 5-by-2-cup piece). Leave last bottom piece intact.
2. Cut the sides off the 2 top halves; discard. Curve two 6-by-1-cup pieces into semicircles by cinching together adjacent cups with duct tape.
3. On a flat surface, lay out the 2 semicircles, open side up, for neck. Attach 1 end with duct tape, leaving the other end open. For remainder of body, lay out pieces as shown, using the 6-by-2-cup piece for the back, the 5-by-2-cup piece for the front, and one top-carton piece for each arm. Use duct tape to attach these to the neck piece.
4. For the chest strap, cut a length of duct tape to go around the child's midsection; fold in half lengthwise, then tape it to the end of the front piece.
5. For arm straps, cut four 9-inch lengths of duct tape to go around the arms; fold in half lengthwise, then tape 2 to each arm piece. Place the entire contraption on child, securing neck piece with tape. Use tape to secure chest strap to back piece and to secure straps around arms. Tape reserved buttons to chest strap and arm bands.
6. For belt, tape the remaining three 6-by-1-cup pieces together end to end; secure ends around waist with tape. Use 2-by-3-cup pieces for knee pads. Fold four 8-inch lengths of duct tape in half lengthwise, tape to knee pads for straps. Put on child; secure ends with tape.
7. Use a hot-glue gun set on low to glue the bottom of a plastic cup inside the opening of a cookie press. Make a cone of red construction paper. Apply hot glue to cone's bottom edge; affix to cup.
8. You'll need about 55 Styrofoam cups; label bottoms as you work to keep track of the rows. Start with 1 cup (row 1), open side down, and space 6 cups (row 2) evenly around it, hot-gluing them where they touch row 1.
9. Glue 6 more cups (row 3) in the spaces of previous row. Continue through row 8. Glue more partial rows for back of helmet (to row 9 or 10, depending on size).
10. For strap, fold two 7-inch pieces of duct tape in half lengthwise; secure with tape.

Flapper Costume How-To
What's shaking? The Charleston is the sweetest dance in town when the flapper wears a dress of shimmying sugar packets. This gal has pink cupcake-cup roses at her hip, in her hair, and on her shoes; her necklace is a stapled strand of cellophane-wrapped candies.
Materials
2 boxes sugar packets
1 pack paper cupcake holders
1 pack mini-muffin holders
1 pack wrapped candy
1. For the base of the dress, we sewed pieces of two adult T-shirts together; you can use an old sundress instead. Start by cutting two adult medium-size T-shirts horizontally just below armpits. Then cut off the finished hem from the bottom of three sleeves (two of these will become the dress straps, and one will be used for the flapper's headband); discard the rest of the shirts' top halves.
2. On one shirt, fold and pin a tuck on both sides. Hand-stitch in place at top and bottom (shirt will fit closely at the hips and chest and billow slightly at the center). Turn inside out.
3. Trim other shirt to this new width (leaving enough fabric for a small seam allowance); turn inside out, and machine-stitch trimmed edges together.
4. Line up cut edges of both shirts, with hems at top and bottom; sew shirts together to make one tube.
5. For the straps, cut two of the sleeve hems so they're no longer loops; line up with tucks, and sew to dress.
6. For the fringe, place sugar packets side by side, and staple together at top to form a strip; packets should not overlap on side -- the dress will get too heavy.
7. Make each strip long enough to wrap around the dress (we used about two dozen packets per row); 8 to 10 rows should suffice. Slip a piece of cardboard inside the dress to separate the layers, then hot-glue strips to lower half of dress, beginning at the bottom -- the rows should overhang each other slightly to hide staples.
8. To create a scalloped edge along bottom hem and at the waist, fold paper cupcake holders in half; attach using hot glue. Dress can be worn over a white leotard and fishnet tights, if desired.
9. You'll need 8 to 10 cupcake cups to decorate the headband and shoes, and 10 to 12 larger paper muffin cups for the cabbage rose at the hip. Fold the cups in half, one or more at a time, varying the number you use.
10. Nestle one half circle inside another on the perpendicular; staple together at the center. Build the flower by adding more and more "petals," placing each at a quarter turn every time; staple each layer.
11. When finished, pinch, twist, and rustle the paper for flourish. Thumb the crimped edges; trim the interior of the flower with scissors. Cover the staples on the back with tape. Attach roses to fabric with hot glue; use small safety pins to secure to ballet slippers.
12. Staple cellophane-wrapped candies end to end.
Related: 19 Tips for Perfect Laundry Every Time

Knight and Dragon Costumes How-To
Aha! To the dragon's lair! Via the baking aisle! These two make an imposing knight and dragon team. The breastplate and the dragon's scales are candy cups; the leg and arm armor is cut from aluminum pans; a folded pie tin is the hilt of the foil-clad broadsword. No need to fear the baby dragon she breathes milk and her spikes are made of sponges.
Materials
2 packs foil candy cups
1 box brass paper fasteners
1 foil roasting pan
3 foil pie pans
1 roll aluminum foil
12 kitchen sponges
1. You'll need 100 silver foil candy cups; flatten and halve each. Lay a 2-foot piece of 1/2-inch-wide double-fold bias tape in a U shape.
2. Using craft glue, attach a row of half circles inside fold, leaving room for ties. Using transparent tape, add on rows of foil cups until desired size is reached. Wear over gray sweatshirt if desired.
3. Glue together overlapping foil half circles; stud with brass paper fasteners. Cover fastener prongs on inside with cloth tape for comfort.
4. Make a duct-tape belt (sticky sides facing) to cinch sweatshirt.
5. Shape pieces from foil pans. Turn edges in; staple ribbon to corners to tie. Use mini pie pans for knees.
6. Using craft glue, line the middle of the back of a sleeper and a matching hat with gold-colored candy cups cut in quarters.
7. Cut tail shape from cardboard; insert into a leg cut from a pair of red tights. Stuff with batting; stitch closed.
8. Sew wide end to sleeper. Hot-glue more gold cups to tail. Cut sponges into wave shapes; hot-glue along spine.
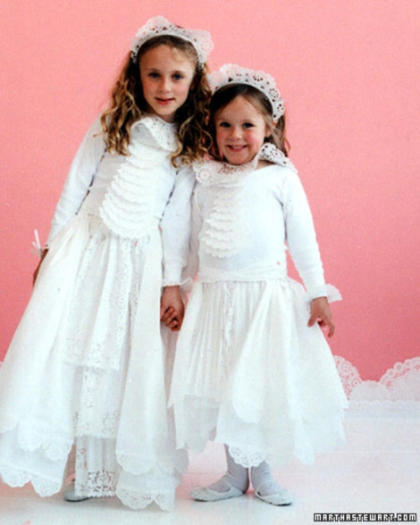
Princess Costume How-To
Tra la la! The prettiest princesses must wear lots of lace, and paper doilies will do splendidly. These girls are dressed in underskirts made from plastic kitchen bags and pleated paper place mats, and overskirts made from plastic tablecloths and doilies. Their ruffled jabots are made of doilies cut in fan shapes of graduated sizes. Now where are their knights in shining armor?
Note: Young children require supervision around plastic bags and pins.
Materials
1 pack drawstring trash bags
1 pack paper place mats
1 plastic tablecloth
4 packs doilies in various sizes
1. Loosen seal on a white kitchen-size drawstring trash bag so drawstring moves freely. For pleats, accordion-fold six to nine paper place mats; flatten slightly and fold clear packing tape over top edge.
2. 2. Tape pleats to front of bag, overhanging rows.
3. Fold a 54-by-108-inch plastic tablecloth in half widthwise (fold is waistline), and trim 3 or 4 inches from bottom edge of top layer; save scrap.
4. Staple 1-inch pleats along fold; fold scrap piece over staples for waistband, leaving extra for ties, and staple (cover staples with tape). Cut small doilies in half; tape to hem.
5. Cut fan shapes in graduated sizes from doilies; layer as shown, and tape at back. Safety-pin to shirt.
6. Cut through to center of 10-inch doily, and remove a circle for neck hole. Fold 1/4-inch-wide bias tape along inside edge, leaving extra for ties; glue. Repeat with 4-inch doilies for cuffs.
7. Trace plastic headband onto 8-inch doily; cut out. Cut 1/2-inch-deep tabs along cut edge; fold up tabs, and glue to headband. Safety-pin small fan-shaped doilies to shoes.

Cheerleader Costume How-To
Hip, hip, hooray! The crowd will go wild for this cheerleader and her very cheer-full ensemble. The pleated skirt is made from strips of yellow sponge cloths and blue tape; the pom-poms, from checkered mop heads. Bright shoelaces, dot stickers, and a paper-star cutout deserve extra applause.
Materials
2 fabric mop heads
2 packs sponge cloths
1 roll packing tape
1 pack dot stickers
1 pair shoelaces
1. Fold two 12-inch lengths of 2-inch-wide packing tape in half lengthwise, and affix to plastic top of fabric-style mop heads by wrapping ends with more tape.
2. Trim two 15-by-14-inch sheets of sponge cloths so they're each 10 inches long. On underside of one cloth, draw an evenly tapered strip that's 2 1/2 inches wide at one end and 3 inches wide at the other; cut out.
3. Use this strip as a template, and continue making strips, alternating between the 2 1/2- and 3-inch ends to maximize cloth (the 2 1/2- inch ends will form the top of the skirt).
4. Starting at the 2 1/2-inch end of a strip, use a hot-glue gun to apply a line of glue about 3 inches down one side; overlap the glued portion with another strip. Repeat with remaining strips.
5. Cut a piece of double-fold bias or packing tape to the size of the glued strips, plus 12 inches on each side for ties. Fold tape in half over top, and glue.
6. Cut out a star from colored construction paper, and affix to a white shirt with double-sided tape. Decorate sneakers with colorful shoelaces and dot stickers.

Hula Dancer Costume How-To
These girls were transformed into hula dancers in one afternoon. Their leis are made of vibrantly colored gift bows; their swinging skirts, fashioned from rope-style mop heads. The dancer on the left is even a ukulele player; her instrument is made out of recycled cardboard cereal boxes, a paper-towel tube, and rubber bands.
Materials
2 rope-style mop heads
2-inch-wide cloth ribbon
1 pack gift bows
1 pair flip-flops
2 cereal boxes (1 small, 1 mini)
1 roll paper towels
1 box brass paper fasteners
1. Cut two rope-style mop heads down their center seams to create four panels; line up side by side.
2. Cut a piece of 2-inch-wide cloth ribbon the length of the panels, plus 12 inches on each side for tying.
3. Using a hot-glue gun, apply glue to the edges of the panels; fold ribbon in half over edges.
4. Cut ribbon to desired lengths for lei, headpiece, and bracelets. For lei, make about six evenly spaced crimps in ribbon, securing each with transparent tape so it will lie flat around neck.
5. Affix self-adhesive gift bows in assorted sizes and colors to each ribbon; loop ribbons and secure ends with double-sided tape.
6. Decorate flip-flops by affixing one large gift bow to the top of each strap.
7. You'll need a small cereal box and a mini cereal box. Flatten boxes, cut along one side of each, and reassemble inside out using tape.
8. Use a foam cup to trace a circle on the center of the small box; cut out with scissors or a utility knife. Attach 3 brass fasteners about 1 1/2 inches below hole.
9. Cut 2 inches off one end of a paper-towel tube. Use the tube to trace one circle on the top of the small cereal box and another on the bottom of the mini cereal box; cut out.
10. Attach three brass fasteners to the front of the mini cereal box. To connect boxes to tube, apply hot glue to inside edges of holes, and insert one end of tube in each. For strings, attach three long rubber bands to fasteners at both ends.
More from Martha Stewart:
Instant Organization: Get It Together in 15 Minutes or Less
20 Super-Efficient, Super-Effective Ways to Clean All the Things
47 Ways to Maximize Space in Your Kitchen
Martha Stewart's Favorite Outdoor Halloween Decoration Ideas (52 of Them!)
These festive tattoos have a similar easy-come, easy-go appeal.
